| Materials and equipment |
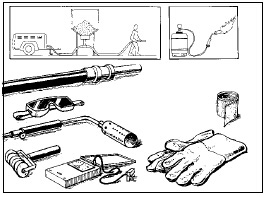 |
1. Appropriate size WSS60/80 sleeve and closure, epoxy primer, mixing sticks, applicator pad, protective gloves.
2. Torch or equivalent.
3. Propane tank with regulator, hose and gauge.
4. Contact pyrometer
5. Siliconized hand roller (curved).
6. Siliconized hand roller (straight)
7. Standard safety equipment such as gloves, goggles, hard hat, etc. |
| Notes |
 |
*Installation must be done according to local regulations and usual safety precautions.
*This installation instruction is intended for the WSS60/80 system to be installed on pipes coated with fusion bonded epoxy, coal tar enamel, 2 or 3 layer PE.
*For the selection of Dasheng’s joint protection materials for other pipe coatings, see Dasheng product selection guide or contact our sales.
|
 |
 |
1. Clean exposed steel and adjacent pipe coating to be covered by WSS60/80 sleeve. Remove all contaminants such as oil. Use a solvent that contains no grease or oil type materials.
|
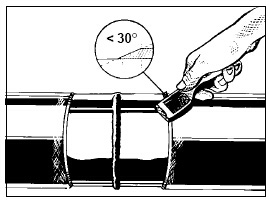
2. If not factory beveled, chamfer the adjacent pipe coating to an angle of preferably 15, maximum 30. Inspect the edge of the existing pipe coating. Disbonded sections have to be trimmed of and the coating edge has to be beveled again. To avoid possible contamination, it is recommended to use a scraper.
|
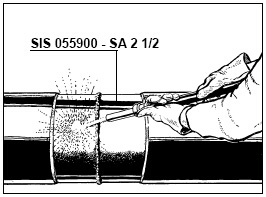 |
3. Grid blast or sand blast the steel surface to remove loose and foreign materials. The surface should be cleaned to SIS 055900 -SA 21/2.
For pipelines operating at ambient temperature, power wire brush cleaning to SIS 055900 - ST3 can also be used. However, the use power wire brushing increases the risk on surface contamination and creates less anchor pattern than blasting. As a result, after installation certain properties can be different compared to values obtained from installations done on shot blasted surface. As an alternative to power wire brushing, a power grinding disk with a flexible disk grade P20 or P24 can be used.
|
 |
 |
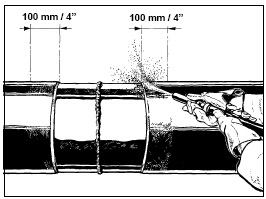
4. Grid or sand blast the adjacent pipe coating over a distance of at least 100 mm(4"). The total width should be approximately 50 mm larger than the width of the Dasheng supplied WSS60/80 sleeve.
Remove the white protective layer of coaltar enamel to ensure a new fresh coaltar surface.
Note: prior to blasting, it is recommended to preheat the exposed steel to 40 - 70° C to avoid flash rust formation.
|
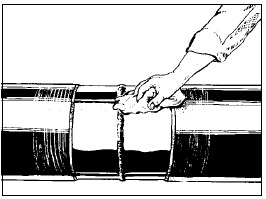
5. Wipe the surface to remove dust and remaining blasting material. Use a clean dry cloth or air blow.
|
 |
 |
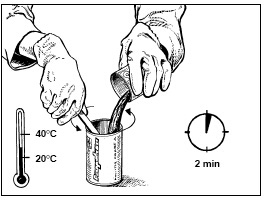
6. Dose the two component epoxy. Use pre-dosed epoxy kits. For pre-dosed epoxy kits, pour content of can B into can A and mix for approximately 1 minute. For easy disposal, it is recommended to pour this mixture back into can A and mix for another 30 seconds. As such, the remaining epoxy in both cans will cure and can be easily disposed off. Follow local regulations for safe disposal.
Mixed epoxy primer has a pot life of approximately 30 minutes at ambient temperature. As long as the epoxy primer is still liquid, it may be used.
For easy mixing and dispensing, the epoxy primer should be used at a temperature of min. 18° C. When necessary, keep the epoxy primer at a heated place.
|
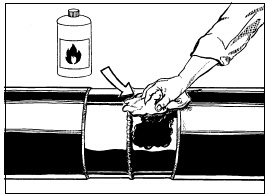
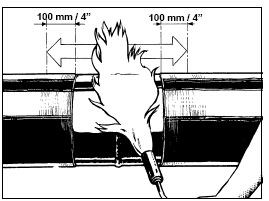
7. Adjust the torch to a yellow topped blue flame of approximately 500 mm (20") long. Preheat the steel and the adjacent pipe coating to 60° C minimum, 100° C maximum. Preheating of the surface reduces the installation time and ensures proper bonding. Make sure that all necessary items including mixed epoxy primer are in close proximity before starting preheating.
In bad weather conditions, use proper shielding such as a wind shield in windy conditions or a well ventilated tent in the case of rain.
|
 |
8. Check the preheating temperature with a contact pyrometer |
 |
 |
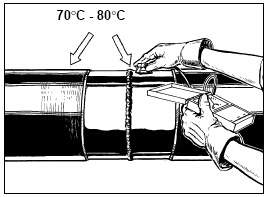
9. Immediately after preheating, apply the mixed epoxy primer to the bare steel and the adjacent pipe coating using a applicator pad.
The total width of the primer should be 50 mm larger than the width of the WSS60/80 heat shrinkable sleeve. Visually check the surface and ensure all bare steel and line coating is covered by the epoxy primer.
|
10. If not factory cut, cut the corners of the
Underlaying end of the sleeve to approximately 15 mm x 50 mm.
|
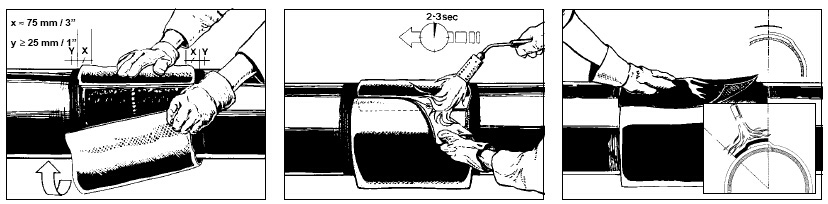 |
11. Immediately after the application of the epoxy primer, and while the epoxy primer is still wet, loosely wrap the WSS60/80 sleeve centrally around the welded joint. The edge of the sleeve with the trimmed corners should be on the pipe first. The sleeve
should overlap in the 10 to 2 o’clock position and the overlap of the sleeve onto itself should be at least 50 mm.
The sleeve should be wrapped around the joint leaving a gap of minimum 25 mm (1 inch) between the bottom of the pipe joint and the sleeve.
|
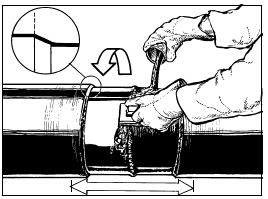
12. Gently heat the inside of the overlapping sleeve edge and press down onto the opposite sleeve and with a gloved hand.
|
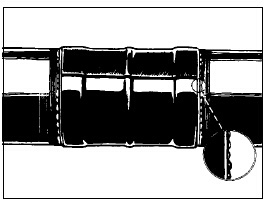
13. Heat the inside of the closure patch for 1 - 2 seconds. Position it evenly over the edge of the heat shrinkable sleeve. Press it down firmly.
In case of a factory supplied pre-attached closure patch, this step is not necessary.
Only heat the patch material and maximum one inch of the heat shrinkable sleeve on both sides of the patch. |
 |
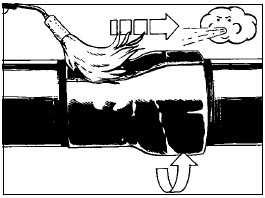
14. Starting heating the closure patch from one side and slowly move to the other side whilst
pressing down with a gloved hand to ensure good bonding and eliminate air entrapment.
During and after the heating, the fabric reinforcement becomes visible as an indication that the closure patch has been heated to the minimum required temperature.
|
 |
 |
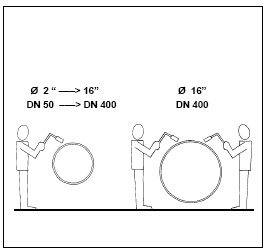
15. For sleeves for pipes 400 mm (16") diameter and larger, two installers are recommended.
|
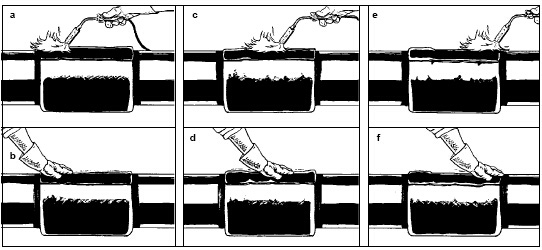
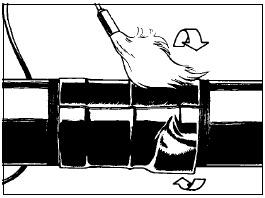
16. Begin heating at the center of the sleeve and heat circumferentially around the pipe using a constant paintbrush motion. Continue heating toward one end of the sleeve, followed by the other. In case of strong wind, begin heating the sleeve from one end of the sleeve, opposite to the wind and heat circumferentially around the pipe, using a constant paintbrush motion. The flame should not be held perpendicular to the sleeve but should be directed towards the shrinking direction.
|
 |
 |
17. Continue heating toward the other end of
the sleeve. Ensure that the total sleeve has been heated evenly and has completely shrunk tightly around the pipe..
|
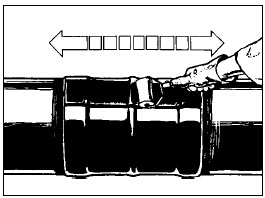
18. Possible air entrapments can be reduced to the maximum by post rolling of the sleeve. Immediately after the sleeve has been shrunk onto the joint area and while the sleeve is still hot and soft, roll the entire sleeve with a segmented roller. Start rolling from the weld bead towards the sides forcing possible air enclosures out of the sleeve. Special attention should be given to the longitudinal and circumferential weld bead, the transition of the mill coating and the patch area. If necessary, areas may be reheated to roll out air.
|
 |
19. The sleeve is fully recovered when all of the following have occurred :
1) The sleeve has fully conformed to the pipe and adjacent coating.
2) There are no cold spots or dimples on the sleeve surface.
3) Weld bead profile can be seen through the sleeve.
4) After sleeve is cool, adhesive flow is evident on both edges.
|  Installation help.pdf Installation help.pdf |